Getting Started
Prerequisites for using OTTR
You do not need to be an expert to get started. A few basics will help:
- Writing: basic Markdown plus Quarto or R Markdown, depending on your template.
- GitHub: an account and enough comfort to create repositories, update settings, and read GitHub Actions results.
- Workflow: use the browser-only entry path if you are new to Git, or install Git/GitKraken for local editing.
Choose what you want to build
Courses
Use this path when: you are building chaptered learning materials, modules, or a course website.
Do not start an OTTR course setup from a forked repository if you plan to use OTTRfy. OTTRfy works with regular repositories, so use a template-generated repository or a new repository instead.
Quarto Courses
Best for new course builds
Template repository: ottrproject/OTTR_Quarto
Need more help? Check out the full setup guide here.
R Markdown Courses
Best for .Rmd or Bookdown courses
Template repository: ottrproject/OTTR_Template
Need more help? Check out the full setup guide here.
Websites
Use this path when: you want a project website, documentation site, resource hub, or public-facing guide without course-style chapters.
Do not start an OTTR website setup from a forked repository if you plan to use OTTRfy. OTTRfy works with regular repositories, so use a template-generated repository or a new repository instead.
Quarto Websites
Best for new websites
Template repository: ottrproject/OTTR_Quarto_Website
Need more help? Check out the full setup guide here.
R Markdown Websites
Best for existing .Rmd sites
Template repository: ottrproject/OTTR_Template_Website
Need more help? Check out the full setup guide here.
Dashboards
Metricminer Dashboard
Use this path when: you want a dashboard that reports project metrics from GitHub, Google Analytics, Google Forms, CRAN, Calendly, and other sources.
Template repository: ottrproject/metricminer-dashboard
- Create a new repository from the metricminer-dashboard template.
- Make the repository public, then enable GitHub Actions Read and write permissions and Allow GitHub Actions to create and approve pull requests.
- Add a repository secret named
GH_PATusing a classic personal access token withrepoandworkflowscopes. - Add credentials for the metric sources you want to collect from.
- Deploy from the
mainbranch and/docsfolder in GitHub Pages, then enable HTTPS.
Dashboard setup notes Settings, secrets, and first deploy
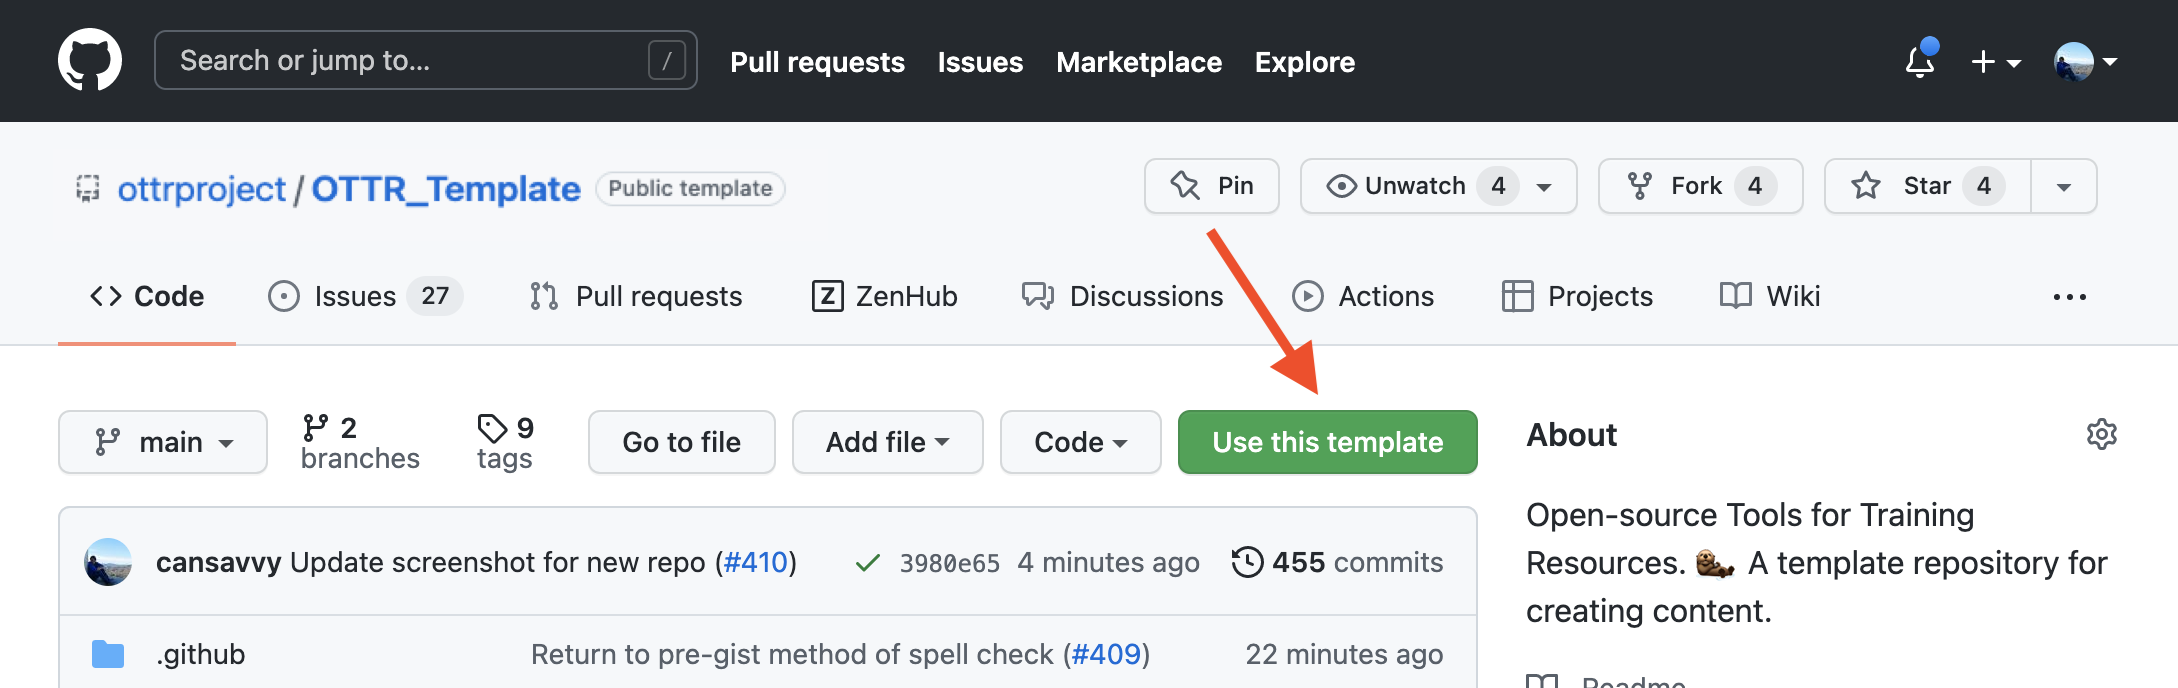
On the landing page of the metricminer-dashboard repository, locate the green Use this template button in the upper right corner. Click it, then select Create a new repository and follow the instructions.
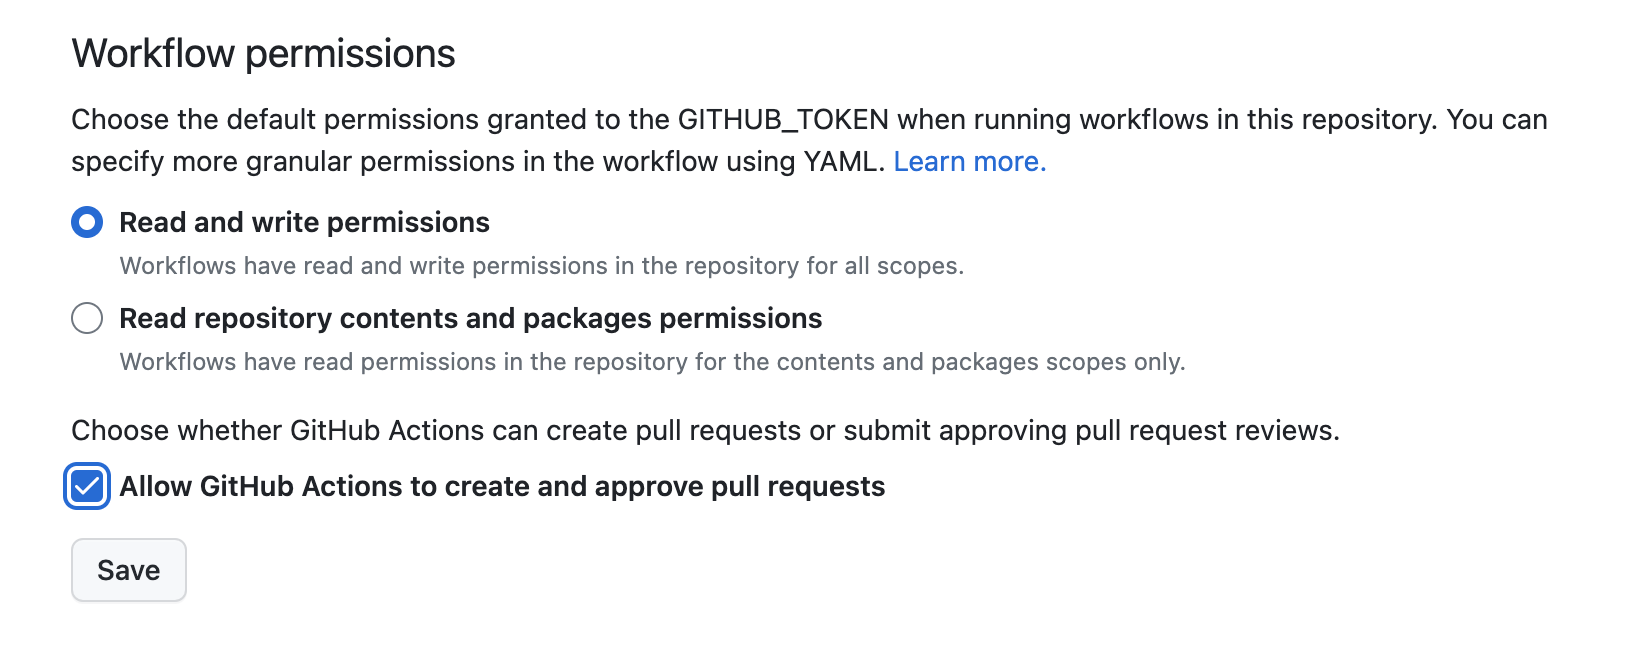
After creating your repository, go to Settings > Actions > General. Make sure you have:
- Given Read and write permissions.
- Checked Allow GitHub Actions to create and approve pull requests.
Then click Save.
Go to Settings > Secrets and variables > Actions > Repository secrets and click New repository secret. Add:
- Name:
GH_PAT(this exact name is required) - Secret: create a classic personal access token with
repoandworkflowscopes checked.
Set up credentials for whichever metric sources you want to collect from. Each source requires its own repository secret — see the metricminer documentation for the specific tokens needed (Google Analytics, GitHub, etc.).
In your repository, go to Settings > Pages and configure:
- Source: Deploy from a branch
- Branch:
main, folder/docs
Click Save, then check Enforce HTTPS at the bottom of the page.
Warning: If you visit your URL before pushing any file changes, you may see a 404 error. Check after filing your first pull request.
Edit the template’s .Rmd files to configure which metrics to display and how to arrange them. If you adapt the dashboard into a Quarto site, use .qmd files with the same project-specific metric code. See metricminer.org for full documentation.
If you wish to contribute to OTTR, please take a look at our Code of Conduct.
Now that your repository is set up, see Next Steps → for what to do next.